Automatically translated from Dutch by AI. Read the original
Conversations with the architect
From the first pitch to the first drawings and choice of materials
Exploratory conversation #1
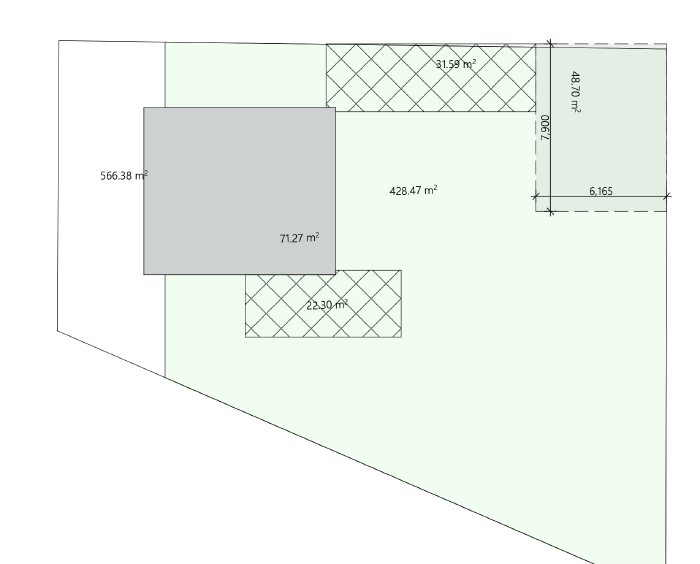
In December 2024 I briefly told my brother-in-law about the idea of a garden office and that I’d like him to work out the maximum I could build without a permit in the corner of the garden. On New Year’s Eve, while we were frying oliebollen, he started calculating. You put doughnuts in and a drawing comes out, let’s say.
While drawing, he kept referring to it as a ‘garden shed’, whereas in my head I had a smart office. After the third ‘garden shed’ I told him, slightly irritated, that it was going to be a garden office with high standards. It has since become a meme among family and friends and is always used as a joke, by me and by others. Thanks!
As you can see in the drawing, it’s the 48.70 m² building in the top right. It sits in the space against my garage, against neighbour 1’s garage and against a garden wall/fence belonging to neighbour 2. That immediately makes for a nice challenge, because I’m dealing with three different heights that I’ll be building along and against.
Making a rough first draft of the plan
After our conversation I started out as a freelance software developer in April 2024, alongside my job at a secondment agency. In November 2024 I was able to fill my time full-time with the freelance work. In the run-up to and during these transitions it was busy, and my focus was on other projects.
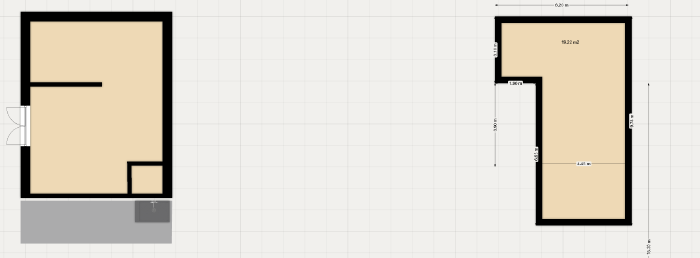
During my holiday in September 2024 I did start drawing. The approach was:
- Build to the maximum, because the few metres I’d have left over would be a waste
- A space with few walls so I can easily rearrange it
- The toilet against the garden side so I can one day add an outdoor tap/outdoor shower
As you can see, I played around with the shape a bit. The thought behind it was that otherwise the building would look too ‘chunky’ in the space. I stood in the garden several times and put down blocks to mark it out. That didn’t help much, because I found it hard to judge the size of both the building and the space inside it. Harder than during the renovation of our ground floor, where the space was easy to take in and the old furniture was there. So I left that for the architect for the time being, since he knows a thing or two about it.
I also wasn’t at all sure yet which materials I would use. I was thinking of timber frame, but bricklaying against the walls of my garage and the neighbours’ was also an option. What I found tricky here was the situation with the surrounding buildings. All questions to answer later!
Conversation #2 and the first drawings
At the end of September I sat down with my brother-in-law again. Once again I first stuffed him with food (that works well on him) and then we got started.
Daylight
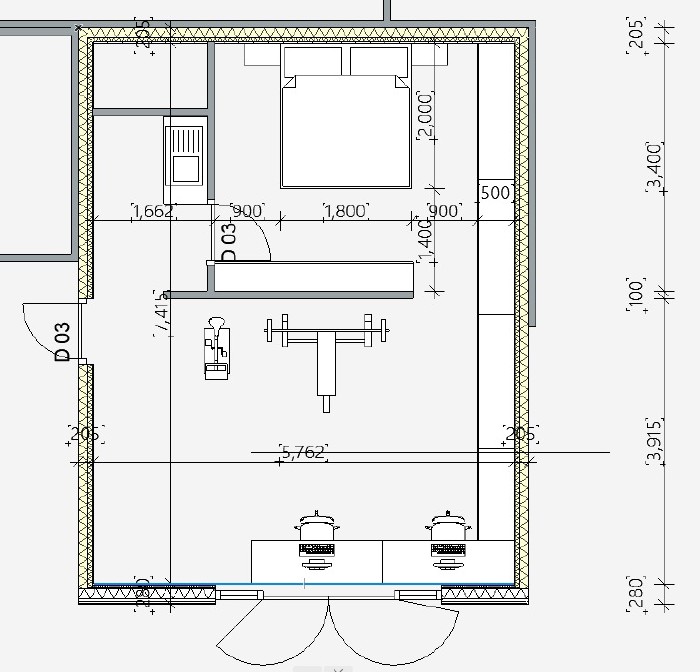
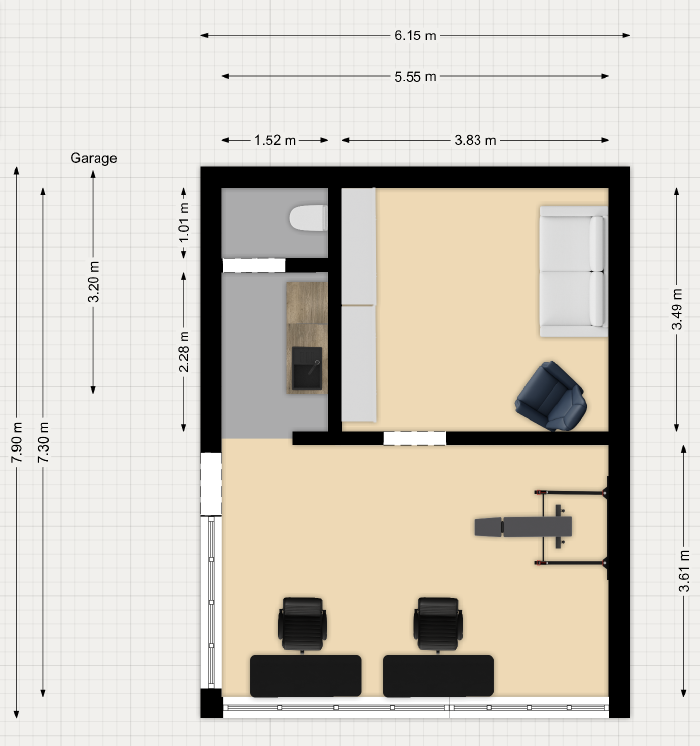
Toilet, kitchen, a relaxation room with space for a bed, space for a piece of fitness equipment and my office. I presented my layout and practically straight away he opted to move the toilet to a ‘dark corner’. Laying pipes and conduits in the foundation isn’t that much work. The biggest advantage is simply that you keep more space for daylight.
Conversely, the relaxation room was also designated as a guest room. There you want more privacy, and you quickly end up with a wall along the whole length with a door you can close. Reasons such as getting changed out of sight and watching television without reflections on the screen.
These days he also includes a recess at the windows as standard, because it makes it very easy to hide screens in there.
Choice of materials
Walls
Bricklaying, SIP panels, industrial sandwich panels and a vapour-open/airtight construction all came up. It quickly became clear to me that insulating well was important to me, but I was told in no uncertain terms that insulating well also means ventilating well. Vapour-open has additional advantages such as natural moisture regulation and sound absorption. It’s a material that lets vapour out, and because it is soft it has very good sound insulation.
- Bricklaying is always an option, but bricks insulate nothing and carry moisture from two sides. That would sacrifice at least 100 mm of what could have been insulation in a new construction.
- SIP panels dropped out on cost; they weren’t worth it for a small project.
- With industrial sandwich panels you get a kind of plastic-bag insulation and quickly unforeseen moisture build-up if you don’t ventilate extremely well.
Put simply, vapour-open/airtight was the most logical choice for me from the very start. I’d already seen and read so much about it that I was completely sold. For an explanation of vapour-open/airtight building, it’s probably best to watch this video . This good man (yes, he was also on the Dutch emigration show ‘Ik vertrek’) gives a nice explanation.
For the chosen building style you need cladding. Our house has black timber, so I was going to carry that over into the fascia boards and window frames. For the cladding out of sight, I also wanted to find cheap cladding in that colour. Where it’s visible I want to use brick slips to get a natural and modern look.
As an alternative, I myself mentioned that vertical orange-coloured timber you see a lot these days, but the architect didn’t think it a good idea. He sees a lot of discolouration develop. If one part spends much of the day in shade and another part is in constant sun, you get that very quickly. Also, vertical timber doesn’t look good if your house has horizontal fascia boards and cladding.
Roof
For the roof I’m getting a ‘warm roof’, which can’t regulate moisture and is therefore vapour-tight. With a flat roof that’s really your only option.
- Cold roof: roof covering -> structure (-> air cavity != not possible with a flat roof) -> insulation -> vapour barrier
- Warm roof: roof covering -> insulation -> vapour barrier -> structure
On a flat roof, the roof covering and vapour barrier always end up directly against the next layer. It does have to be watertight, after all. That automatically gives you a problem with a cold roof. You enclose the structure (timber) with the insulation, and any moisture that does get in stays there forever and causes rot. With a warm roof you don’t have this problem, because the vapour barrier protects your structure from moisture and the structure sits on the inside of your thermal envelope.
This is quite a fine line and I see it go wrong quite often on building forums. Projects where a warm roof is retrofitted with insulation (often by professionals) between the joists. A tool like ubakus can help you here. The reason it often goes wrong is that a dew point forms in your joists, moisture can no longer escape and it condenses. Rot is the result. Using less heating is nice, but moisture problems are many times worse and more expensive.
Floor build-up
I went into the conversation with underfloor heating/heating panels and other lovely ideas. Using the mass of the foundation for heating and cooling. I once saw a building designed so that the winter sun (which is lower) fell on the concrete and the summer sun didn’t. Hours of enjoyment from the warmth/coolness you store in it. What I hadn’t considered, of course, was that this isn’t cost-effective and is expensive for a garden office. You need a separate boiler, and the hours of enjoyment are limited to the time I’m actually in there. It isn’t a house with several people walking around all day.
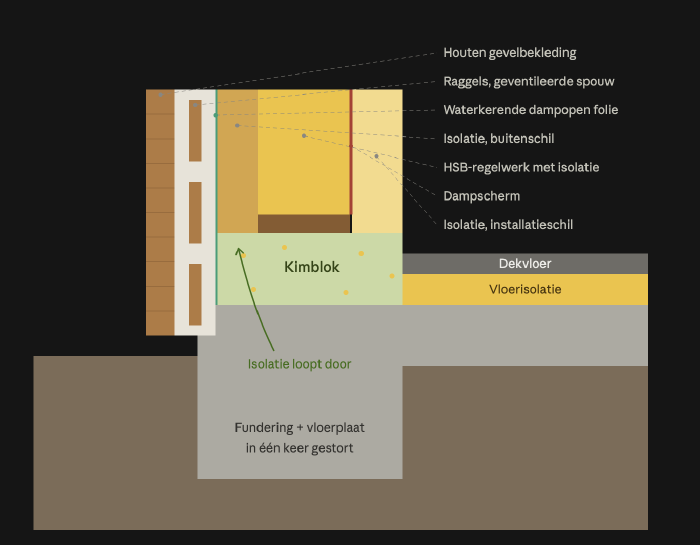
I already knew I wanted to pour the foundation and floor slab in one go. I’d picked that up from Henrie and his self-build course . It means the concrete plant and pump truck only have to come once, which is a considerable cost saving.
Both points made the floor build-up fairly straightforward, because no insulation was needed around the foundation and no underfloor heating. I can simply pour the foundation and then lay a floating screed with the floor finish on top.
Heating/air renewal
Air conditioning that can also heat is by far the most cost-effective choice in a well-insulated space where you only spend a few hours a day. Based on the architect’s experience, I didn’t look further into things like infrared heating. It soon gets very expensive and isn’t on/off the way only air conditioning can be.
Air circulation with good airtightness is crucial, so mechanical ventilation also has to be considered. The locations for this were also relatively straightforward. Extract goes in the toilet, with the obvious incidental benefits, and supply on the other side of the building. They’re relatively simple to install and often have heat recovery.
Stubborn requirement
Over the years I’d read plenty of stories online about unhappy customers and situations where an outer wall of an existing structure is used as the outer shell of your construction. For example, a contractor who builds with insulation straight against the neighbours’ outer wall. Although that works fine and only causes problems if something is ever removed, it doesn’t feel right to me. I’m not going to connect to existing walls anywhere, with any of the surrounding buildings. There will always be a minimum cavity of a few centimetres so that both facades keep their ventilation.
After our meeting the following sketch came out, and after some back-and-forth phone calls it was adjusted on certain points.
Costs
Quite fittingly, my brother-in-law advised me to put these details into a budget when I estimated the build itself (excluding air conditioning and other systems) at 10-15k. You can read more about that in the next article.
What now?
Done
- Vapour-open / airtight
- Floor build-up in broad strokes
- Warm roof build-up
- Layout decided
Next step
- A rough budget to decide whether I still want to go ahead or get cold feet.